Wednesday, October 31, 2012

Buckeye Sewing Retreat Day 3

Judy and I woke up at 7:45 a.m. and were surprised we sleep so late!  We headed to breakfast and it was great; I had a cheese omelett, orange juice and milk.  Then it was back to sewing!!
I wanted to finish the paper piecing of my Feathered Star and get the pieces trimmed and possibly get some of the pieces sewn together.  Unfortunately it took longer to paper piece the border sections then I thought.  I still have a couple more to complete then it will be time to sew all the pieces together.
At 11:00 a.m. we started show and tell.  There were 25 of us with varying skills and experiences.  There were many different projects worked on over the weekend. 
Baby quilts, Mystery tablerunners, Memory quilts, Tote bags, Chenille pillows, Thimbleberries quilts, Twister quilts, Charity quilts made from fabric books, Raindeer wall hanging, Sampler quilts, 3200 strip quilt, Paper pieced quilts, binding of quilts and wall hangings, Friendship Star lap quilt, 10 minute table runners, 60 degree triangle table runners, Fast Crazy quilt demonstration and many more projects.
Check out the slideshow for all the pictures!!!
I had a great time and renewed some friendships and made new friends.  I heard more than one person say that this was cheaper then therapy!!  Laughter and quilting definately go together!!
Click to play this Smilebox slideshow

Create your own slideshow - Powered by Smilebox
This free photo slideshow customized with Smilebox

Buckeye Sewing Retreat Day 2

Saturday my roommate Judy and I were up early and headed to breakfast around 7:30 a.m.  Breakfast was great; I had a waffle, orange juice and milk.  Then it was back to sewing!!
My table mate wasn’t up yet so I decided to bind my first Judy Niemeyer quilt Desert Sky.  I used the same fabric for this binding as I did on my Bali Breeze.
 

I started the binding and hanging sleeve on one of my Scarlet and Gray Bargello wall hangings, and then we broke at noon for a lunch of Salad, Chicken Noodle Soup, and Pie again!!
 
 
Then it was back to sewing.  I finished both the Bargello wall hangings then it was time for a nap!!  I need to rest my neck and back, prior to The Ohio State Buckeyes football game!!  During the game I sewed down the hanging sleeves on the both of the Bargello wall hangings.
 
After we defeated Penn State I started getting out my paper piecing supplies for my Feathered Star. I had a number of border sections to paper piece.
I did manage to stay up till about 10:30 p.m. without any sewing mistakes or rotary cutter accidents!!
 
My final post will include some of the beautiful projects that some of the quilters worked on this weekend.

Blogger's Quilt Festival Fall 2012

Amy's Creative Side is sponsoring the Blogger's Quilt Festival Fall 2012


Thanks to Amy and the prize sponsors for once again giving us the opportunity to share our quilts at the 2012 Fall Blogger's Quilt Festival.
I can't wait to sit down with a glass of wine and enjoy the show.


The quilt I selected to share is my Spinning Sampler quilt.  For those of you meeting me for the first time, I am an Ohio State Buckeyes alumni and fan.  A number of my quilts are made from Scarlet and Gray fabric, thats where I got the name for my blog

This is a quilt I started after I took a class from Marti Michell using her Perfect Patchwork Templates at the 2010 Lake Farm Park’s Quilt Show. She displayed a number of samplers in class in 12” and 6” sizes. So I started one using my Scarlet and Gray stash that includes twelve 12" blocks on point, with a 24" Carpenter’s Wheel center medallion block.

 
Starting at the top the 12 blocks used in the quilt are Rising Star, Weathervane, Northern Lights, Rosette, Pieced Star, Hidden Star, Rolling Sawtooth Star, Ohio Star, Dutchman’s Pinwheel, Sweet Sixteen, Martha Washington Star, Wild Goose.
 

I used a layout I found in Electric Quilt’s EQ7 and then added a border that includes 200 Flying Geese. I’m not sure what really possessed me to make that many Flying Geese??

I machine pieced the quilt and had it professionally long arm quilted by Jennifer McCann of Galena, Ohio and it measures 80" by 80".  It is eligible for awards in The Favorite Bed quilt and Favorite Professionaly Quilted categories.


I'm so glad that I decided to enter the quilt in the 2012 Lake Farm Parks Quilt Show. This is the third quilt I have entered in this show. My quilt actually made it into the video on the website!!
I was so excited when I found out I had won a ribbon!!!


I entered it in the 2012 NQA Quilt Show in Columbus, Ohio.  I hope the Buckeye fans enjoyed my Scarlet and Gray Spinning Sampler.

Tuesday, October 30, 2012

Buckeye Sewing Retreat Day 1

I arrived at the Inn at Amish Door in Wilmot, Ohio at about 9:30 a.m. on Friday morning for the start of the Buckeye Sewing Retreat sponsored by the Calico Cupboard in Pataskala, Ohio.  It was beautiful day too travel, I just wish the fall leaves had stuck around a couple days longer.  I grabbed a luggage cart to unload everything from my car!! 
 
I had 8 quilts/wall hangings that needed bindings attached and sewn down.  My sewing machine, acrylic table, display board, 2 quilt kits, Feathered Star paper piecing project, rulers, cutting board, a shoe box of tools including, rotary cutter, extra rotary cutter blades, thread, bobbins, pins, chalk pencil and many other tools of the quilting trade!  I also took my Spinning Sampler for show and tell.
When I got upstairs Sherry directed me to my table so I could unload.  That table became my home away from home for the weekend.  I wish I had the space for a table that measured 4’ by 8’ in my sewing room!!
My table mate wasn’t there yet so I had both tables to myself for a while.  That allowed me to get my bigger quilts done.  I decided to work on the 2 quilts that are gifts first.  I had cut the fabric for the bindings last weekend, but I still needed to sew the strips together and press them, prior to attaching.  I attached the binding with my machine and then folded it to the back and used Clover Binder clips to keep it in place, as I sewed in the ditch from the front.  Since these are not SHOW quilts I figured sewing the bindings on by machine would work ok.
I love using a stripe for bindings, because they end up on the diagonal!!
 
I need to design and print labels for both of these prior to presenting them as gifts.
I managed to catch the backing when attaching the bindings to both of my first 2 quilts, so that required some reverse sewing with my seam ripper!!
Then I moved on to my first From Marti and Me Club quilt, Bali Breeze.  I used the same fabric that was in the border to bind the quilt.
 
Next was my Halloween Wall hanging
 
We broke at 6:00 p.m. and had a wonderful dinner of Salad, Rolls, Fried Chicken, Roast Beef, Mash Potatoes, Green Beans and Pie!!
Then it was back to sewing!!
I only worked until about 9:30 p.m., I have a tendency to make sewing mistakes and rotary cutter mistakes after 9 p.m.!!!

I will have another post later this week for Saturday!!!

Monday, October 29, 2012

Flat Stanley and the Buckeye Quilters

Flat Stanley kept an eye on us at the Buckeye Sewing Retreat at the Inn at Amish Door in Wilmot, Ohio.  Brooklyn’s grandmother brought him with her to join the fun!!  He joined us from the Hamilton Elementary School in Franklin County, Ohio.
Stanley was there to help us cheer on The Ohio State University Buckeyes football team to victory over the Penn State University Nittany Lions. 
 
Stanley made sure that I was in bed early to prevent any sewing mistakes or injuries with sharp scissors or rotary cutters. 
Thanks Stanley for visiting us!!

Friday, October 26, 2012

Buckeye Sewing Retreat

I'm on my way to the Inn at Amish Door in Wilmot, Ohio for the Buckeye Sewing Retreat!!!

Myself and 20 other sewers and quilters will be enjoying Amish food, free time to sew/quilt and everything Buckeyes!!

I have my Scarlet and Gray clothes ready, 5 quilts to attach binding to, a couple quilt kits for my fellow Buckeye Doris to start and my Feathered Star. 

In addition to all the tools I need: Sewing Machine, Acrylic Table, Rotary cutter and mat, paper piecing tools, Binding Tool, Clover Binding clips and a lot more!!  The car will be packed from floor to trunk!!

I figure I can work on removing paper from the Feathered Star while we watch the Buckeyes play Penn State on Saturday evening.  That is if the Inn gets ESPN!!!

I will miss my boys!!  Jim, Garfield and Nermal.

I will take pictures of my progess and post next week!!

Hope everyone has a great weekend!!

Thursday, October 18, 2012

Haunted Halloween and Rail Fence Border

At the beginning of the month I was a part of the Fall EQ Blog Hop.

One of the other participants was Bea and she recently had a Rail Fence tutorial and asked to see how others had used the Rail Fence in their EQ7 projects.
 
I talked about using PrePrinted Panels and EQ.
 
Haunted Hallow 2
 
Here is the final layout that I did in EQ7.
 
 
It includes a Rail Fence border with 4 triangle blocks.
 
I recently had it quilted by Becky at Ruby Blue Quilts.
 
 
I will be adding the binding when I attend a Buckeye Sewing Retreat at the Amish Door next weekend.


Saturday, October 13, 2012

Feathered Star - Chapter 5


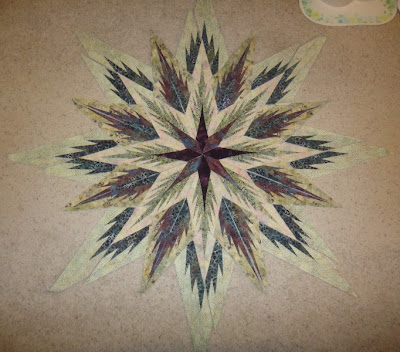
Here is what my Feathered star looks like prior to adding the background and borders.


I have selected the background for behind the star.
 
 
And then I started auditioning fabrics for the border.

With the feather tips being light and medium I struggled using the fabric I had.  Most of them ranged from light to medium.  Fortunately Quilts and Sew Forth was running their batiks on sale so what is a girl to do???  I picked up some more Merlot which was used in the center and then a couple more purples that are darker.  I think they will blend together but still be dark enough for the border.

 
What do you think?
 
 
Tomorrow I need to spend the day getting the border sections cut so I can start sewing!!!


Feathered Star Quilt - Chapter 3 done and Chapter 4 almost done!!

At the end of Chapter 2 this was what my Feathered Star looked like.
 

 Now I have completed Chapter 3 and 4..


Some of the wedges have been sewn together.


It's actually turning out really nice!!  I even got a complement out of my DH!

Free Motion Class with Barb Shambaugh

Spent today at Cottonpickers taking a Free Motion Class from Barb Shambaugh. 
If you get a chance to take a class from Barb, do it!!!  She also teaches for Pins and Needles.
 
She taught us alot about the different thicknesses of thread, needle types and sizes, and machine tension.
 
Also the importance of stabilizing your pieces by stitching in the ditch.
 
She had us practice drawing loops, as in crucif e's and l's.  Then we transfered that to the sewing machine.  I had a poorly wound bobbin so that caused some issues.  It was interesting how I was able to actually hear my machine no the right speed for good stitches.
 
I haven't found my sweet spot with my machine yet, but I will keep trying.
 
She said I would need 10,000 hours of practice!!!
 
Which means that Becky at Ruby Blue Quilts doesn't have to worry about losing my business any time soon!!!

Friday, October 5, 2012

Fall EQ Blog Hop - Using PrePrinted Panels

Thanks to SewCalGal for asking us to share our EQ7 (Electric Quilt) experiences with other quilters.  If you haven't had a chance I encourage you to check out the other blogs from earlier this week.

Monday, Oct lst

SewCalGal

Beaquilter

Tuesday, Oct 2nd

Marjorie's Quilting Bee

Curious Orange Cat

Wed., Oct 3rd

Love Bug Studios

Thursday, Oct 4th

Kissed Quilts

Bits and Pieces

Friday, Oct 5th

I Quilt Scarlet and Gray (That's Me)

EQ Blog
I purchased EQ7 back in May of 2010. I have another quilt design package, but decided to purchase EQ7 when I saw all the positive feedback. My first quilt that I designed took about 4 hours and I only contacted tech support once! I took 2 blocks from the Eleanor Burns Quilt Blocks on American Barns book and created a quilt based on a picture in the book. Using the block instructions the first time out helped me when designing the blocks, sashing and borders.


I use EQ7 for pattern testing, wall hangings, quilts, totes and labels. The majority of my projects are rotary cut and machine piecing.

I have a tough time visualizing how my quilts will look, so I download or scan fabric to use in EQ7.  This allows me the ability to actually see what my quilt will look like.   When working with fabrics you have downloaded into EQ7 you may have adjust the size to get the fabric to look right in your quilt.  I design the quilt and then play with the fabric placement as much as I want.

To make a quilt using pre-printed panels you have to start by deciding what size you will be trimming the panel to.


Sea of Dreams by South Sea Imports

This is the center of a baby quilt that I worked on this summer.  I was able to find it on the web and then imported it into EQ7 as a photo.  Marlene's post for the Fall EQ blog at Kissed Quilts explains how to manipulate your image within EQ7.

I created a custom quilt with a center layout of 22.5" x 41", then I started adding borders.
 I new I wanted to use 6" finished blocks in my outside border, so I had to add skinny borders of 1" and .75" around the panel to get the center to the proper size of 24.5" x 42.5".

By importing the panel as a photo I could set it onto the layout and then adjust it to the proper size.


Then I added the borders


and then the Twinkling Star and Animal blocks.


What I love about EQ7 is the ability to change colors and fabrics and to move blocks around. 

Here are a couple other panels I recently worked with.

 
Haunted Hallow 2 by Red Rooster


Becky Silbaugh at Ruby Blue Quilts recently posted pictures of the above table runner being quilted.

I have used this same technique to add stiched centers to my designs.  I took a picture of the stiching and then cropped it and imported it.


 I actually enlarged the the stiching pattern and then printed it on to EQ Printable fabric.

I hope I have answered some of your questions on using panel fabric in EQ, contact me if you have any other questions.